Construct your own CDK Construct Library
by Philipp Garbe
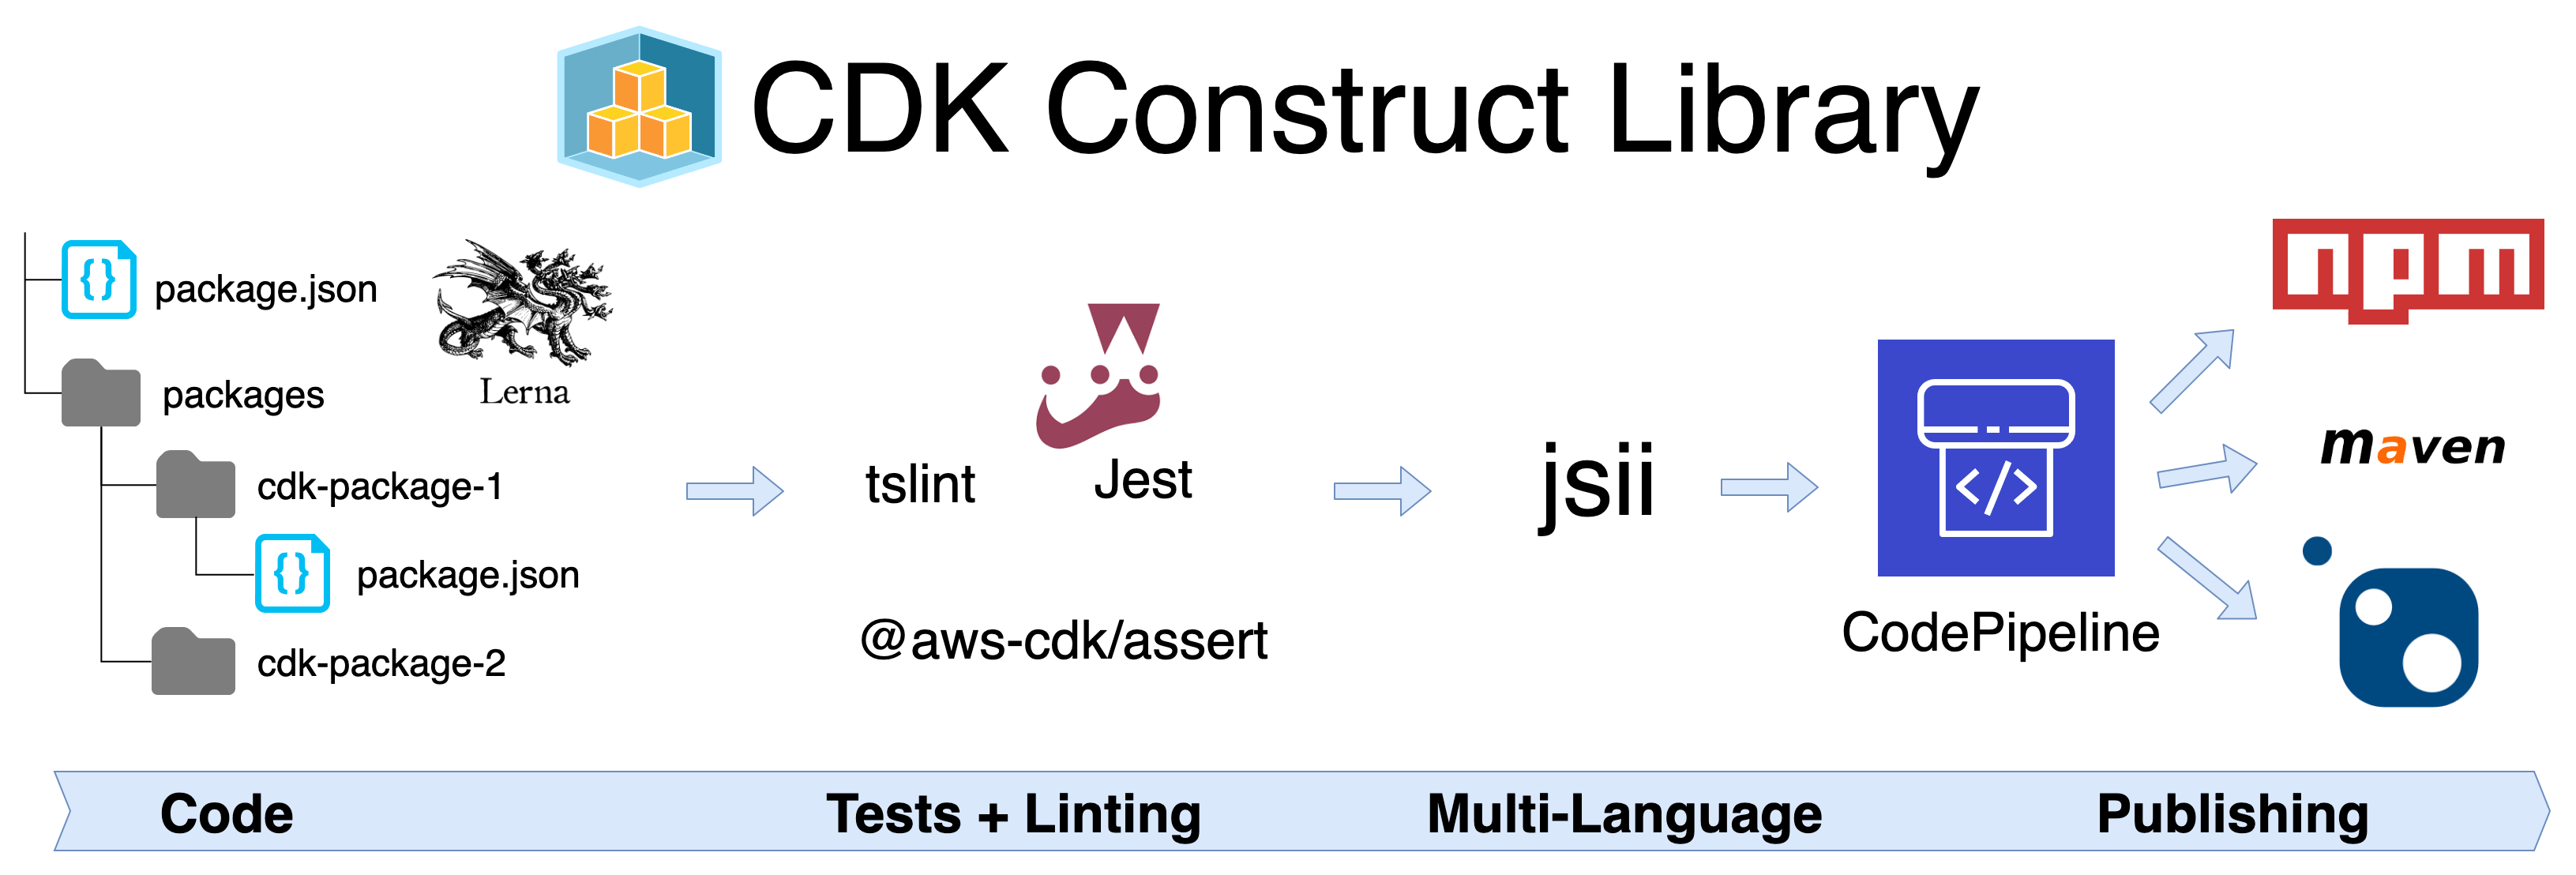
As I wrote in the AWS Blog, the biggest advantage of the AWS CDK for me is that you can write your own Constructs and then easily share them using existing package managers. This guide should help you to set up your own CDK Library and how to share your constructs.
This article is not a step-by-step guideline but focus on the important parts. I took the official AWS CDK repo is an inspiration and created my own CDK constructs library on GitHub. Check it out!
Disclaimer:
I’m new to TypeScript and CDK and still learning. Let me know if things can be done better or more easily in my examples.
Using LernaJS
If you plan to build only one package, you can skip this part, because LernaJS is made to handle repositories with multiple npm packages. It creates releases, optimizes dependencies and can run the same npm commands for all packages.
There are just a few steps to initialize a new project with the necessary files and folders:
# Install lerna globally
npm install --global lerna

# Create new directory
mkdir my-cdk-library

# Initialize current directory
lerna init

# Create new package and initialize it as CDK lib
cd packages && mkdir cdk-example  && cd $_
cdk init lib --language=typescript
See Lerna docs for more information.
Lerna is intended to work with JavaScript and not TypeScript. But as you will see later, we need TypeScript. So read this blog post, which explains how to use LernaJS with TypeScript (but skip the publishing part, as this will be a bit different for CDK libs).
I’m skipping now the part how to write your own constructs and continue with tests.
Unit Tests
Compared to “classic” CloudFormation, CDK makes it easy to write tests. Especially, for shared constructs, it makes total sense to have automated tests to ensure that specific resources are created with correct values. Tests can also document why a certain code is like it is.
With @aws-cdk/assert, the CDK team provides a handy library to simplify asserts. Install it together with jest as a dev dependency:
npm i --save-dev jest @types/jest ts-jest @aws-cdk/assert
Create a jest.config.js file to configure Jest to use TypeScript settings.
module.exports = {
  preset: 'ts-jest',
  testEnvironment: 'node',
}
A test can look like this and is placed in any *.ts file inside the __tests__ subfolder of your package:
import { expect, haveResource } from '@aws-cdk/assert';
...

test('test fargate cluster construct', () => {
  // GIVEN
  const stack = new cdk.Stack();
  const vpc = new ec2.VpcNetwork(stack, 'VPC');

  // WHEN
  new fc.FargateCluster(stack, 'Service', {
    vpc
  });

  // THEN - stack contains a public load balancer as default
  expect(stack).to(haveResource('AWS::ElasticLoadBalancingV2::LoadBalancer', {
    Scheme: "internet-facing"
  }));
});
In your root package.json add a test script so you can run your tests with npm run test.
{
  "scripts": {
    ...
    "test": "jest",
  }
Linting
A good practice is to lint your code. It helps to make it more readable and easier to review.
Install tslint and initialize it in every package folder.
# Install tslint as a dev dependency
npm install tslint typescript --save-dev

# Create tsconfig.json in each package folder
lerna exec tslint -i
In package.json of each package, add a lint script:
{
  "scripts": {
    ...
    "lint": "tslint 'lib/**/*.ts{,x}'"
  }
}
The CDK team itself is using an additional tool called awslint, which is linting the CDK libraries against their own guidelines (AWS Resource Construct Design Guidelines).
Unfortunately, awslint cannot be used to check your own libraries, but there’s already an issue to make it publicly available.
Multi-language support
What makes CDK unique is that it can be used in the language of your choice. If you also want to publish your constructs for different languages, all you have to do is to replace the ts compiler with jsii. Jsii calls internally the ts compiler to build and also watch code changes. But the package command will generate and compile your package to all specified target languages. The output packages will be emitted to outdir.
First, install the necessary packages as dev dependencies:
npm i --save-dev jsii jsii-pacmak
Change the scripts section in all your package.json and add an additional jsii configuration.
{
  // ...

  "main": "lib/index.js",
  "types": "lib/index.d.ts",
  "scripts": {
    ...
    "build": "jsii",
    "watch": "jsii -w",
    "package": "jsii-pacmak -v"
  },
  "jsii": {
    "outdir": "../../dist", // A common dist directory for all packages
    "targets": {
      "java": {
        "package": "com.acme.hello",
        "maven": {
          "groupId": "com.acme.hello",
          "artifactId": "hello-jsii"
        }
      },
      "dotnet": {
        "namespace": "Acme.HelloNamespace",
        "packageId": "Acme.HelloPackage"
      },
      "sphinx": { }
    }
  }
}
See jsii readme for more information.
CI/CD using CodePipeline
The last piece is an automated pipeline to ensure that everything compiles, your linter is happy and tests are green. Also, releases of your packages should be done automatically.
So what could be better to publish a CDK construct than another CDK construct?
The pipeline will be stored in a new folder (e.g. “pipeline”) and needs to be deployed separately. The folder contains a few files which are described below. The idea of the pipeline is to build, test, lint and package your library. And if the specified version is not published it can publish the packages to all configured package managers.
The first file is a package.json which contains some useful scripts.
{
  "name": "cdk-constructs-pipeline",
  "version": "0.1.0",
  "scripts": {
    "synth": "cdk synth -o build --app 'node -r ts-node/register pipeline.ts'",
    "deploy": "cdk deploy --app 'node -r ts-node/register pipeline.ts'",
    "diff": "cdk diff --app 'node -r ts-node/register pipeline.ts'"
  },
  "devDependencies": {
    "@types/node": "^11.10.4",
    "aws-cdk": "^0.24.1",
    "ts-node": "^8.0.2",
    "typescript": "^3.3.3333"
  },
  "dependencies": {
    "@aws-cdk/cdk": "^0.24.1",
    "aws-delivlib": "^3.4.8"
  }
}
The pipeline itself is defined in pipeline.ts.
import delivlib = require('aws-delivlib');

export class PipelineStack extends cdk.Stack {
  constructor(parent : cdk.App, id : string, props : cdk.StackProps = { }) {
    super(parent, id, props);

    const github = new delivlib.GitHubRepo ({
      repository: 'pgarbe/cdk-constructs',
      tokenParameterName: 'github-token', // Refers to an unencrypted SSM parameter
    });

    const pipeline = new delivlib.Pipeline(this, 'MyPipeline', {
      // Build, Test, Lint and package your libarary here
    });
    const pipeline = new delivlib.Pipeline(this, 'GitHubPipeline', {
      title: 'CDK Constructs',
      repo: github,
      pipelineName: 'cdkconstructs-master',
      notificationEmail: 'some email',
      buildSpec: {
        version: '0.2',
        phases: {
          install: {
            commands: [
              'npm install npm -g', // Update npm itself
              'make bootstrap',     // Install all dependencies
            ],
          },
          build: {
            commands: [
              'make package',       // Run build, tests, linter and package
            ],
          },
        },
        artifacts: {
          'files': [ '**/*' ],
          'base-directory': 'dist',
        },
      },
    });

    // Publish artifacts to NPM (or maven, nuget), if they don't exist already
    pipeline.publishToNpm({
      npmTokenSecret: { secretArn: 'arn:aws:secretsmanager:eu-west-1:1234567890:secret:npm-xyz' },
    });
See aws-delivlib readme for more information.
One of the downsides of CodePipeline is that it needs to be deployed separately and can’t update itself. That’s why you have to deploy it every time you make changes.
npm install
npm run deploy
If you want to trigger a new release bump a new version with lerna version which allows you to set the next version, updates all package.json files and commits and push the changes, so that the pipeline can take care of the rest.
Wrapping up
It took me a while to set up the basic pieces to be able to write and publish my own constructs. And that’s also the reason, why I want to share it. As a lot of things are still under heavy development, my hope is that it gets easier over time.
I hope this guide helps you a bit. Please, don’t be afraid and share your feedback with me.
Currently, there’s a lack of overview of what CDK constructs in the community exists. Hopefully, this will change in the near future. In the meantime, a good starting point is Awesome CDK, a “curated list of awesome projects related to the CDK.
Subscribe via RSS